
 结构型模式
结构型模式
AI 整理版
本篇已整理为更适合学习与复习的笔记结构,欢迎前往阅读:结构型模式-AI整理版。
设计模式中的结构型模式有以下几种:
- 适配器模式(Adapter Pattern)
- 桥接模式(Bridge Pattern)
- 装饰器模式(Decorator Pattern)
- 组合模式(Composite Pattern)
- 外观模式(Facade Pattern)
- 享元模式(Flyweight Pattern)
- 代理模式(Proxy Pattern)
适配器模式(Adapter Pattern)
适配器模式(Adapter Pattern)是一种结构型设计模式,它允许将一个类的接口转换成客户端所期望的另一种接口。
通俗地说,适配器模式就是将一个类的接口转换成另一个客户端所期望的接口,以实现类与客户端之间的兼容。
在软件开发中,经常会遇到需要复用一些现有的类,但这些类的接口与客户端所期望的接口不一致的情况。如果直接修改现有类的接口,会牵扯到大量的修改工作,同时也有可能会破坏现有类的封装性,因此不是一个好的选择。这时,适配器模式就可以派上用场,通过一个适配器来转换现有类的接口,以满足客户端的需求。
适配器模式通常包括两种类型:类适配器和对象适配器。类适配器使用继承来实现适配器,而对象适配器使用组合来实现适配器。
适配器模式的优点包括可以增加类的透明性和复用性,可以让客户端使用现有的类,同时也可以让现有的类与客户端协同工作。但是适配器模式也有一些缺点,例如会增加系统的复杂度和代码的阅读难度,同时也可能会影响系统的性能。因此,在使用适配器模式时需要权衡其优缺点,选择合适的实现方式。
如何使用
在Spring Boot中使用适配器模式,可以通过以下步骤实现:
创建一个接口(Target),定义需要适配的方法。
javapublic interface Target { /** * 三孔转两孔插座 */ void twoSocket(); }创建一个适配器类(Adapter),实现Target接口,并持有一个被适配的对象(ThreePinSocket)。
java@Component @RequiredArgsConstructor public class Adapter implements Target { private final ThreePinSocket threePinSocket; /** * 目标是实现可以调用三孔插座 */ @Override public void twoSocket() { threePinSocket.insert(); } }创建一个被适配的类(ThreePinSocket),其中包含一个需要适配的方法(insert)。
java@Slf4j @Component public class ThreePinSocket { public void insert(){ log.info("三口插座被插入电器插头。"); } }
这样,在Adapter中调用twoSocket方法时,实际上是调用了适配器中的insert方法,从而实现了适配功能。
   @Autowired
    private Adapter adapter;

    @Test
    void testAdapterPattern(){
        adapter.twoSocket();
}GitHub学习地址:java-design-patterns/localization/zh/adapter at master · iluwatar/java-design-patterns (github.com)
桥接模式(Bridge Pattern)
桥接模式是一种结构型设计模式,它能够将抽象部分与实现部分分离开来,从而使它们可以独立地变化,而不会相互影响。桥接模式的核心思想是将一个类的功能和实现分离开来,使得它们可以独立地变化,而不会相互影响。这样,我们可以在不修改原有代码的情况下,动态地切换不同的实现方式,从而达到灵活性和扩展性的目的。
具体来说,桥接模式是通过将抽象类与其实现类分离开来,将它们变成两个独立的继承等级结构,然后通过一个桥接接口将两个继承等级连接起来。这样,抽象类就可以通过桥接接口来调用实现类的方法,从而达到解耦的效果。
总的来说,桥接模式的主要优点包括:
- 分离抽象部分和实现部分,使得它们可以独立地变化,从而提高了系统的灵活性和可扩展性。
- 对客户端隐藏了实现细节,使得客户端只需要关注抽象部分,从而降低了系统的复杂度。
- 可以动态地切换不同的实现方式,从而满足不同的需求。
- 提高了系统的可维护性和可复用性。
总之,桥接模式是一种非常重要的设计模式,它可以帮助我们解决很多复杂的问题,提高系统的可维护性和可扩展性。
如何使用
在Spring Boot中使用桥接模式,可以通过以下步骤实现:
定义抽象类和实现类。例如,我们定义一个抽闲类MessageService和两个实现QQMessageServiceImpl和WeChatMessageServiceImpl。
java/** * @description: 消息的接口 * @author: black tea * @date: 2023/3/22 15:24 */ public abstract class MessageService { /** * 发送消息 * @param message 消息内容 */ public abstract void sendMessage(String message); /** * 接收消息 * @param message 消息内容 */ public abstract void receiveMessage(String message); /** * 客户端 */ protected Client client; public MessageService(Client client) { this.client = client; } } /** * @description: * @author: black tea * @date: 2023/3/22 15:34 */ @Service("qqMessageService") @Slf4j public class QQMessageServiceImpl extends MessageService { public QQMessageServiceImpl(@Qualifier("QQClient") Client client) { super(client); } @Override public void sendMessage(String message) { log.info("通过qqClient发送消息:【{}】", message); client.sendMsg(message); } @Override public void receiveMessage(String message) { log.info("通过qqClient解码消息:【{}】", message); client.receiveMsg(message); } } /** * @description: * @author: black tea * @date: 2023/3/22 15:57 */ @Service("weChatMessageService") @Slf4j public class WeChatMessageServiceImpl extends MessageService { public WeChatMessageServiceImpl(@Qualifier("weChatClient") Client client) { super(client); } @Override public void sendMessage(String message) { log.info("通过wxClient发送消息:【{}】", message); client.sendMsg(message); } @Override public void receiveMessage(String message) { log.info("通过wxClient解码消息:【{}】", message); client.receiveMsg(message); } }定义客户端的实现的接口。例如,我们定义一个Client接口:
java/** * @description: 客户端接口 * @author: black tea * @date: 2023/3/22 15:36 */ public interface Client { /** * 登录接口、授权接口 */ void login(); /** * 发送消息并编码 * @param message 消息 */ void sendMsg(String message); /** * 接收解码消息 * @param message 消息 * @return String 解码后的消息 */ String receiveMsg(String message); }实现Cient接口。例如,我们实现QQClient和WeChatClient类。
java/** * @description: QQ 客户端 * @author: black tea * @date: 2023/3/22 15:40 */ @Slf4j @Component public class QQClient implements Client { @Override public void login() { log.info("QQ客户端进行QQ登录授权。"); } @Override public void sendMsg(String message) { // // 模仿加密,实际根据文档修改 String encryptMsg = Base64.encode(message, StandardCharsets.UTF_8); log.info("QQ客户端发送编码后的消息,消息内容:【{}】", encryptMsg); } @Override public String receiveMsg(String message) { // // 模仿解密,实际根据文档修改 String decryptMsg = Base64.decodeStr(message, StandardCharsets.UTF_8); log.info("QQ客户端接收消息并解码之后,消息内容:【{}】", decryptMsg); return decryptMsg; } } /** * @description: 微信客户端 * @author: black tea * @date: 2023/3/22 15:50 */ @Slf4j @Component public class WeChatClient implements Client { @Override public void login() { log.info("微信客户端进行微信登录授权。"); } @Override public void sendMsg(String message) { // 模仿加密,实际根据文档修改 String encryptMsg = Base64.encode(message); log.info("微信客户端发送编码后的消息,消息内容:【{}】", encryptMsg); } @Override public String receiveMsg(String message) { // 模仿解密,实际根据文档修改 String decryptMsg = Base64.decodeStr(message); log.info("微信客户端接收消息并解码之后,消息内容:【{}】", decryptMsg); return decryptMsg; } }测试代码:
java@Autowired private MessageService qqMessageService; @Autowired private MessageService weChatMessageService; @Test void testBridgePattern(){ qqMessageService.sendMessage("发送qq消息:123456"); qqMessageService.receiveMessage(Base64.encode("接收qq消息:654321", StandardCharsets.UTF_8)); weChatMessageService.sendMessage("发送微信消息:你好微信,收到请回复"); weChatMessageService.receiveMessage(Base64.encode("接收微信消息:收到。", StandardCharsets.UTF_8)); }在上述示例中,我们使用桥接模式将抽象类和实现类分离,以便更好地管理和维护代码。通过这种方式,我们可以在不影响抽象类的情况下更改实现类,从而更好地应对变化。
GitHub学习地址:java-design-patterns/localization/zh/bridge at master · iluwatar/java-design-patterns (github.com)
装饰器模式(Decorator Pattern)
装饰器模式是一种结构型设计模式,它允许通过将对象包装在具有新行为的装饰器对象中来动态地扩展对象的功能,而不需要修改原始对象的代码。
在装饰器模式中,有一个基本的组件接口,它定义了要被装饰的对象的基本行为。然后有一个装饰器接口,它与基本组件接口相同,但它还包含了一些额外的行为。最后,有一个具体的装饰器类,它实现了装饰器接口,并将基本组件对象包装在其中,以添加额外的行为。
通过使用装饰器模式,可以在运行时动态地添加、删除或修改对象的行为,而不需要修改对象本身的代码。这使得代码更加灵活和可扩展,同时也更容易维护。
如何使用
在Spring Boot中使用桥接模式,可以通过以下步骤实现:
定义一个基本接口RunService:
java/** * @description: 跑步的接口 * @author: black tea * @date: 2023/3/22 16:57 */ public interface RunService { /** * 开始跑步 */ void startRun(); /** * 结束跑步 */ void endRun(); }创建一个具体类RunServiceImpl实现该接口:
java/** * @description: * @author: black tea * @date: 2023/3/22 16:58 */ @Service("runService") @Slf4j public class RunServiceImpl implements RunService { @Override public void startRun() { log.info("开始跑步..."); } @Override public void endRun() { log.info("结束跑步..."); } }定义一个装饰器接口RunServiceDecorator:
java/** * @description: * @author: black tea * @date: 2023/3/22 16:59 */ public interface RunServiceDecorator extends RunService { /** * 开始跑步并计时 */ void startRunTime(); /** * 结束跑步并结束计时 */ void endRunTime(); }创建一个具体的装饰器接口实现类RunServiceTimeDecorator:
java/** * @description: 跑步计时装饰器接口实现 * @author: black tea * @date: 2023/3/22 17:01 */ @Slf4j @Service @RequiredArgsConstructor public class RunServiceTimeDecorator implements RunServiceDecorator { private final RunService runService; private TimeInterval timer = null; @Override public void startRun() { runService.startRun(); } @Override public void endRun() { runService.endRun(); } @Override public void startRunTime() { timer = DateUtil.timer(); this.startRun(); } @Override public void endRunTime() { this.endRun(); log.info("本次跑步,耗费了:{}毫秒", timer.intervalRestart()); } }测试使用:
java@Autowired private RunService runService; @Autowired private RunServiceDecorator runServiceDecorator; /** * 测试 装饰器模式 * @throws InterruptedException */ @Test void testDecoratorPattern() throws InterruptedException { log.debug("测试 装饰器模式"); runService.startRun(); runService.endRun(); runServiceDecorator.startRunTime(); TimeUnit.SECONDS.sleep(5); runServiceDecorator.endRunTime(); }注意:RunServiceImpl 类上标注的注解@Service("runService")必须得像这样标注上名称,否则无法自动注入获得,除非指定名称,如下例子:
java@Service @Slf4j public class RunServiceImpl implements RunService { // 省略 } @Autowired @Qualifier("runServiceImpl") private RunService runService;这样的话,每个注入的就都需要修改了,不建议使用。
GitHub学习地址:java-design-patterns/localization/zh/decorator at master · iluwatar/java-design-patterns (github.com)
组合模式(Composite Pattern)
组合模式是一种结构型设计模式,它允许你将对象组合成树形结构来表示“部分-整体”的层次结构。组合模式使得用户对单个对象和组合对象的使用具有一致性。
在组合模式中,有两种类型的对象:叶节点和组合节点。叶节点表示树形结构中的最底层的节点,它没有任何子节点。组合节点则表示树形结构中的非叶节点,它包含了一个或多个子节点。
组合模式的核心思想是:将对象组合成树形结构,然后通过递归的方式来遍历整个树形结构,从而实现对整个树形结构的操作。
组合模式的优点包括:
- 简化客户端代码:组合模式使得客户端不需要知道对象的具体类型,可以使用相同的方式来处理叶节点和组合节点。
- 增加新的组件变得容易:通过组合模式,可以很容易地添加新的叶节点和组合节点,而不需要对现有的代码进行修改。
- 提高代码复用性:组合模式将相同的操作应用于所有节点,从而提高了代码的复用性。
总之,组合模式是一种非常有用的设计模式,它可以帮助我们更好地管理树形结构,提高代码的可维护性和可扩展性。
如何使用
实现逻辑图,如下:
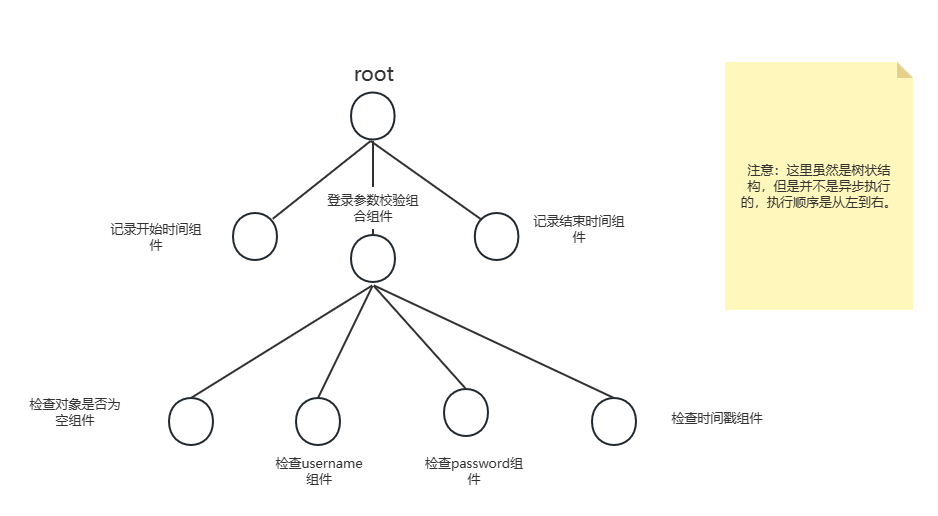
执行顺序:
root ->
记录开始组件 ->
登录参数校验组合组件 ->
检查对象是否为空组件 -> 检查username组件 -> 检查password组件 -> 检查时间戳组件 ->
记录结束时间组件
在Spring Boot中使用组合模式,可以通过以下步骤实现:
注意:如下组件实现类,例如Leaf和Condition,Condition其实就是Leaf,只是我为了区分有没有父级组合组件类才另创的,实际上它就是Leaf(叶子节点),树上面也只有组合组件节点和叶子节点,不会有其他。
定义一个抽象组件类Component:
java/** * @description: 组件类 * @author: black tea * @date: 2023/3/22 17:59 */ public abstract class Component<T> { protected String name; protected Consumer<T> consumer; public Component(String name, Consumer<T> consumer) { this.name = name; this.consumer = consumer; } public abstract void operation(T data); }创建一个继承Component的组合组件类Composite;
java/** * @description: 组合组件类 * @author: black tea * @date: 2023/3/22 17:53 */ @Slf4j public class Composite<T> extends Component<T> { private List<Component<T>> children = new ArrayList<>(); public Composite(String name, Consumer<T> consumer) { super(name, consumer); } @Override public void operation(T data){ Optional.ofNullable(consumer) .ifPresent(c -> c.accept(data)); startForEachComponent(data); } public void add(Component<T> component) { children.add(component); } public void remove(Component<T> component) { children.remove(component); } public void addAll(Collection<Component<T>> components){ children.addAll(components); } private void startForEachComponent(T data){ log.info("【{}】,开始执行所有组件。", this.name); children.forEach(component -> { log.info("执行【{}】组件", component.name); component.operation(data); }); log.info("【{}】,结束执行所有组件。", this.name); } }创建一个继承Component的叶子节点类Leaf;
java/** * @description: 叶子节点组件 * @author: black tea * @date: 2023/3/22 18:08 */ @Slf4j public class Leaf<T> extends Component<T> { public Leaf(String name, Consumer<T> consumer) { super(name, consumer); } @Override public void operation(T data) { consumer.accept(data); } }创建一个登录条件验证类LoginCondition进行使用组件:
java/** * @description: 登录条件验证类 * @author: black tea * @date: 2023/3/22 18:29 */ @Service @Slf4j public class LoginCondition<T> { public void check(T data){ Composite<T> root = new Composite<>("root组件", null); AtomicLong startTime = new AtomicLong(); Leaf<T> startLeaf = new Leaf<>("记录开始时间组件", (d)->{ startTime.set(System.currentTimeMillis()); }); root.add(startLeaf); Composite<T> condition = new Composite<>("登录参数校验组合组件", null); Leaf<T> conditionObj = new Leaf<T>("检查对象是否为空组件", (d) -> { if (d == null){ throw ExceptionUtil.wrapRuntime("对象不可以为空!"); } }); // 比如说存在username和password和timestamp,且timestamp不可以超出当前2分钟 Leaf<T> conditionUsername = new Leaf<T>("检查username组件", (d) -> { Map<String, Object> map = (Map<String, Object>) d; Object username = map.get("username"); if (StrUtil.isEmptyIfStr(username)){ throw ExceptionUtil.wrapRuntime("用户名不可以为空!"); } }); Leaf<T> conditionPassword = new Leaf<T>("检查password组件", (d) -> { Map<String, Object> map = (Map<String, Object>) d; Object password = map.get("password"); if (StrUtil.isEmptyIfStr(password)){ throw ExceptionUtil.wrapRuntime("密码不可以为空!"); } }); Leaf<T> conditionTimestamp = new Leaf<T>("检查时间戳组件", (d) -> { Map<String, Object> map = (Map<String, Object>) d; Long timestamp = (Long) map.get("timestamp"); if (Validator.isEmpty(timestamp)){ throw ExceptionUtil.wrapRuntime("时间戳不可以为空!"); } try { TimeUnit.SECONDS.sleep(3); } catch (InterruptedException e) { e.printStackTrace(); } long currentTimeMillis = System.currentTimeMillis(); if (currentTimeMillis - timestamp > 60000*2){ throw ExceptionUtil.wrapRuntime("当前时间戳超时,请重新生成后再尝试!"); } }); condition.addAll(Arrays.asList(conditionObj, conditionUsername, conditionPassword, conditionTimestamp)); root.add(condition); Leaf<T> endLeaf = new Leaf<>("记录结束时间组件", (d) ->{ log.info("本次执行操作,总耗时{}毫秒。", System.currentTimeMillis() - startTime.get()); }); root.add(endLeaf); root.operation(data); } }测试使用:
java@Autowired private LoginCondition<Map<String, Object>> loginCondition; /** * 测试 组合模式 */ @Test void testCompositePattern(){ log.debug("测试 组合模式"); Map<String, Object> map = new HashMap<>(); map.put("username", "张三"); map.put("password", "11111"); map.put("timestamp", System.currentTimeMillis()); loginCondition.check(map); }
外观模式(Facade Pattern)
外观模式(Facade Pattern)是一种结构型设计模式,它提供了一个简单的接口,隐藏了一组复杂的子系统,使得客户端能够更加方便地使用这些子系统。它的主要作用是简化客户端与子系统之间的交互,降低客户端的复杂度。
在外观模式中,我们会定义一个外观类(Facade Class),它封装了一组复杂的子系统,为客户端提供了一个简单的接口。客户端只需要通过这个接口来访问子系统,而无需关心子系统的具体实现。
举个例子,假设我们要开发一个多媒体播放器,它需要支持播放音频、视频和图片等多种格式。我们可以定义一个外观类,它封装了一组复杂的子系统,包括音频播放器、视频播放器和图片浏览器等。客户端只需要通过外观类提供的接口来播放多媒体文件,而无需关心每个子系统的具体实现。
总之,外观模式可以帮助我们简化客户端与子系统之间的交互,提高代码的可维护性和可读性。
如何使用
这里以访问mysql数据库(django)库获取数据并对外提供接口层来给外部访问作为演示。
在pom中引入jpa和mysql连接配置项:
xml<dependency> <groupId>mysql</groupId> <artifactId>mysql-connector-java</artifactId> </dependency> <dependency> <groupId>org.springframework.boot</groupId> <artifactId>spring-boot-starter-data-jpa</artifactId> </dependency>修改application.yml 配置:
yamlspring: datasource: url: jdbc:mysql://localhost:3306/django?useUnicode=true&zeroDateTimeBehavior=convertToNull&autoReconnect=true&characterEncoding=utf-8&serverTimezone=Asia/Shanghai username: root password: password driver-class-name: com.mysql.cj.jdbc.Driver创建一个实体类App01Userinfo:
java@Entity(name = "app01_userinfo") @Data public class App01Userinfo { @Id private Long id; private String name; private String password; private Integer age; }定义一个接口App01UserInfoRepository继承JpaRepository用来访问数据库的方法:
java/** * @description: * @author: black tea * @date: 2023/3/22 22:39 */ public interface App01UserInfoRepository extends JpaRepository<App01Userinfo, Long> { App01Userinfo findByName(String name); }创建一个逻辑类App01UserInfoService:
java/** * @description: * @author: black tea * @date: 2023/3/22 22:41 */ @Service @RequiredArgsConstructor public class App01UserInfoService { private final App01UserInfoRepository userInfoRepository; public Optional<App01Userinfo> getUserByName(String name){ return Optional.ofNullable(userInfoRepository.findByName(name)); } }创建一个接口类UserInfoController,来对外提供restful接口:
java/** * @description: * @author: black tea * @date: 2023/3/22 23:00 */ @RequestMapping("/user/") @RestController @RequiredArgsConstructor public class UserInfoController { private final App01UserInfoService userInfoService; @GetMapping("{name}") public App01Userinfo getByUserInfo(@PathVariable String name){ Optional<App01Userinfo> userInfoOpt = userInfoService.getUserByName(name); return userInfoOpt.orElseGet(()-> new App01Userinfo()); } }测试使用:
java/** * 测试 外观模式 */ @Test void testFacadePattern(){ log.debug("测试 外观模式"); TestRestTemplate restTemplate = new TestRestTemplate(); String name = "赵羽"; ResponseEntity<App01Userinfo> response = restTemplate.exchange( "http://localhost:" + 8080 + "/user/" + name, HttpMethod.GET, null, new ParameterizedTypeReference<App01Userinfo>() { } ); log.info("查询{}的信息,信息是:{}", name, response.getBody()); }注意:启动 testFacadePattern 方法时,必须保证服务已经启动。
GitHub学习地址:java-design-patterns/localization/zh/facade at master · iluwatar/java-design-patterns (github.com)
享元模式(Flyweight Pattern)
享元模式是一种结构型设计模式,它通过共享对象来减少内存使用和提高性能。在享元模式中,相似的对象会被共享而不是每个对象都创建一个新的实例。
具体来说,享元模式将对象分为两种:内部状态和外部状态。内部状态指对象的固有属性,不会因为环境的变化而改变,可以被共享;而外部状态则是对象的变化属性,会随着环境的变化而改变,不可以被共享。
通过将内部状态抽象成共享对象,可以减少创建新对象的数量,从而节省内存。同时,外部状态可以作为享元对象的参数进行传递,从而实现动态变化。
在实际应用中,享元模式通常用于需要创建大量相似对象的场景,例如游戏中的粒子系统、文本编辑器中的字符等。通过使用享元模式,可以大大提高应用程序的性能和效率。
总之,享元模式是一种优化内存使用的设计模式,通过共享内部状态来避免创建大量相似的对象,从而提高性能和效率。
如何使用
在SpringBoot中使用享元模式,可以通过创建一个享元工厂来管理共享对象。具体步骤如下:
定义享元接口和实现类,定义一个享元接口,包含共享对象的内部状态和外部状态的方法。然后创建一个实现类,实现这个接口。
java/** * @description: 定义享元接口 * @author: black tea * @date: 2023/3/23 13:59 */ public interface Flyweight { void operation(String extrinsicState); } /** * @description: 实现享元接口 * @author: black tea * @date: 2023/3/23 14:00 */ @AllArgsConstructor @Slf4j public class ConcreteFlyweight implements Flyweight { private final String intrinsicState; @Override public void operation(String extrinsicState) { log.info("内部状态:{}", intrinsicState); log.info("外部状态:{}", extrinsicState); } }创建享元工厂,创建一个享元工厂类,用于管理共享对象。在这个类中,可以使用Map来存储已经创建的共享对象,并提供一个方法来获取共享对象。
java/** * @description: 创建享元工厂 * @author: black tea * @date: 2023/3/23 14:02 */ @Component public class FlyweightFactory { private Map<String, Flyweight> flyweightMap = new HashMap<>(); public Flyweight getFlyweight(String intrinsicState) { if (!flyweightMap.containsKey(intrinsicState)) { flyweightMap.put(intrinsicState, new ConcreteFlyweight(intrinsicState)); } return flyweightMap.get(intrinsicState); } }创建享元服务类FlyweightService:
java/** * @description: * @author: black tea * @date: 2023/3/23 14:03 */ @Service @RequiredArgsConstructor public class FlyweightService { private final FlyweightFactory flyweightFactory; public void doSomething(String intrinsicState, String extrinsicState) { Flyweight flyweight = flyweightFactory.getFlyweight(intrinsicState); flyweight.operation(extrinsicState); } }测试使用:
java@Autowired private FlyweightService flyweightService; /** * 测试 享元模式 */ @Test void testFlyweightPattern(){ log.debug("测试 享元模式"); flyweightService.doSomething("n1", "w1"); flyweightService.doSomething("n1", "w2"); flyweightService.doSomething("n2", "w2"); }
在这个示例中,我们定义了一个Flyweight接口和一个ConcreteFlyweight实现类,用于表示共享对象。然后,我们创建了一个FlyweightFactory类,用于管理共享对象。在SpringBoot应用程序中,我们创建了一个FlyweightService类,并将FlyweightFactory注入到这个类中。在这个类中,我们可以通过调用FlyweightFactory的getFlyweight方法来获取共享对象,并传递外部状态。
GitHub学习地址(英文):Java-design-patterns/flyweight在Master ·iluwatar/java-design-patterns (github.com)
CSDN翻译: (117条消息) 享元(Flyweight)模式_梵法利亚的博客-CSDN博客
代理模式(Proxy Pattern)
代理模式是一种结构型设计模式,它允许你提供一个代理对象来控制对另一个对象的访问。
代理模式通常用于以下情况:
- 远程代理:代理对象在不同的地址空间中,可以通过网络进行通信。
- 虚拟代理:代理对象在创建时不会立即加载真正的对象,而是在需要时才进行加载。
- 安全代理:代理对象控制对真正对象的访问权限,可以验证访问者的权限。
代理模式的核心思想是代理对象与真正对象实现相同的接口,代理对象持有真正对象的引用,并在必要时调用真正对象的方法。
代理模式的优点包括:
- 对客户端隐藏真正对象的实现细节,提高了系统的安全性和稳定性。
- 可以在不修改真正对象的情况下,对其进行增强或限制访问。
- 可以实现远程调用,使得客户端可以访问不同地址空间中的对象。
代理模式的缺点包括:
- 代理模式会增加系统的复杂度,因为需要增加代理类和真正对象的接口。
- 代理模式可能会影响系统的性能,因为代理对象需要进行额外的处理,增加了系统的开销。
总的来说,代理模式可以帮助我们实现更加灵活和安全的系统。
如何使用
在SpringBoot中使用代理模式。具体步骤如下:
修改pom,增加aop依赖项:
xml<dependency> <groupId>org.springframework.boot</groupId> <artifactId>spring-boot-starter-aop</artifactId> </dependency>定义一个接口ProxyPatternController,用于接受参数和返回结果:
java/** * @description: * @author: black tea * @date: 2023/3/23 14:53 */ @RequestMapping("proxy") @RestController public class ProxyPatternController { @PostMapping("/{name}") public Map<String, Object> test(@PathVariable String name, @RequestBody Map<String, Object> params){ Map<String, Object> response = new HashMap<>(); response.put("code", 200); response.put("message", "成功"); return response; } }创建一个日志代理切面类LogProxyAspect,用于打印指定目录下所有的controller接口的入参和返回值信息:
java/** * @description: * @author: black tea * @date: 2023/3/23 14:56 */ @Aspect @Component @Slf4j public class LogProxyAspect { @Pointcut("execution(* com.blacktea.structuralpatterns.proxypattern.controller.*.*(..))") public void pointcut() {} @Before("pointcut()") public void beforePointcut(JoinPoint joinPoint) { Map<String, Object> map = new HashMap<>(); Object[] args = joinPoint.getArgs(); MethodSignature signature = (MethodSignature) joinPoint.getSignature(); String[] parameterNames = signature.getParameterNames(); for (int i = 0; i < args.length; i++) { Object arg = args[i]; String parameterName = parameterNames[i]; map.put(parameterName, arg); } log.info("入参进行解析后:{}", map); log.info("接口调用开始,请求参数为:{}", Arrays.toString(joinPoint.getArgs())); } @AfterReturning(pointcut="pointcut()", returning = "result") public void afterReturningPointcut(JoinPoint joinPoint, Object result) { log.info("接口调用结束,返回结果为:{}", result); } }启动项目后进行测试:
java/** * 测试 代理模式 */ @Test void testProxyPattern() throws UnsupportedEncodingException { log.debug("测试 代理模式"); String name = "赵羽"; HashMap<String, Object> map = new HashMap<>(); map.put("number", 1); map.put("isOk", true); map.put("info", "测试代理模式。"); String url = "http://localhost:" + 8080 + "/proxy/" + name; String result = HttpRequest.post(url) .body(JSONUtil.toJsonStr(map)) .timeout(20000)//超时,毫秒 .execute() .body(); log.info("测试 代理模式接口返回的结果:{}", result); }注意:单元测试时,必须保证服务已启动。
也可以不适应单元测试,直接通过postman或是其他工具进行请求测试。
GitHub学习地址:java-design-patterns/localization/zh/proxy at master · iluwatar/java-design-patterns (github.com)