
 Vue3 学习笔记-AI整理版
基于 vue3学习 重新整理。
目标不是“把原文再说一遍”,而是把内容改成更适合学习、复习、回看的笔记结构。
这份笔记怎么读
如果你是第一次系统学 Vue3,建议按下面顺序阅读:
setupref和reactive- Vue3 响应式原理
computed、watch、watchEffect- 生命周期
toRef、toRefs- 其它进阶 Composition API
笔记图
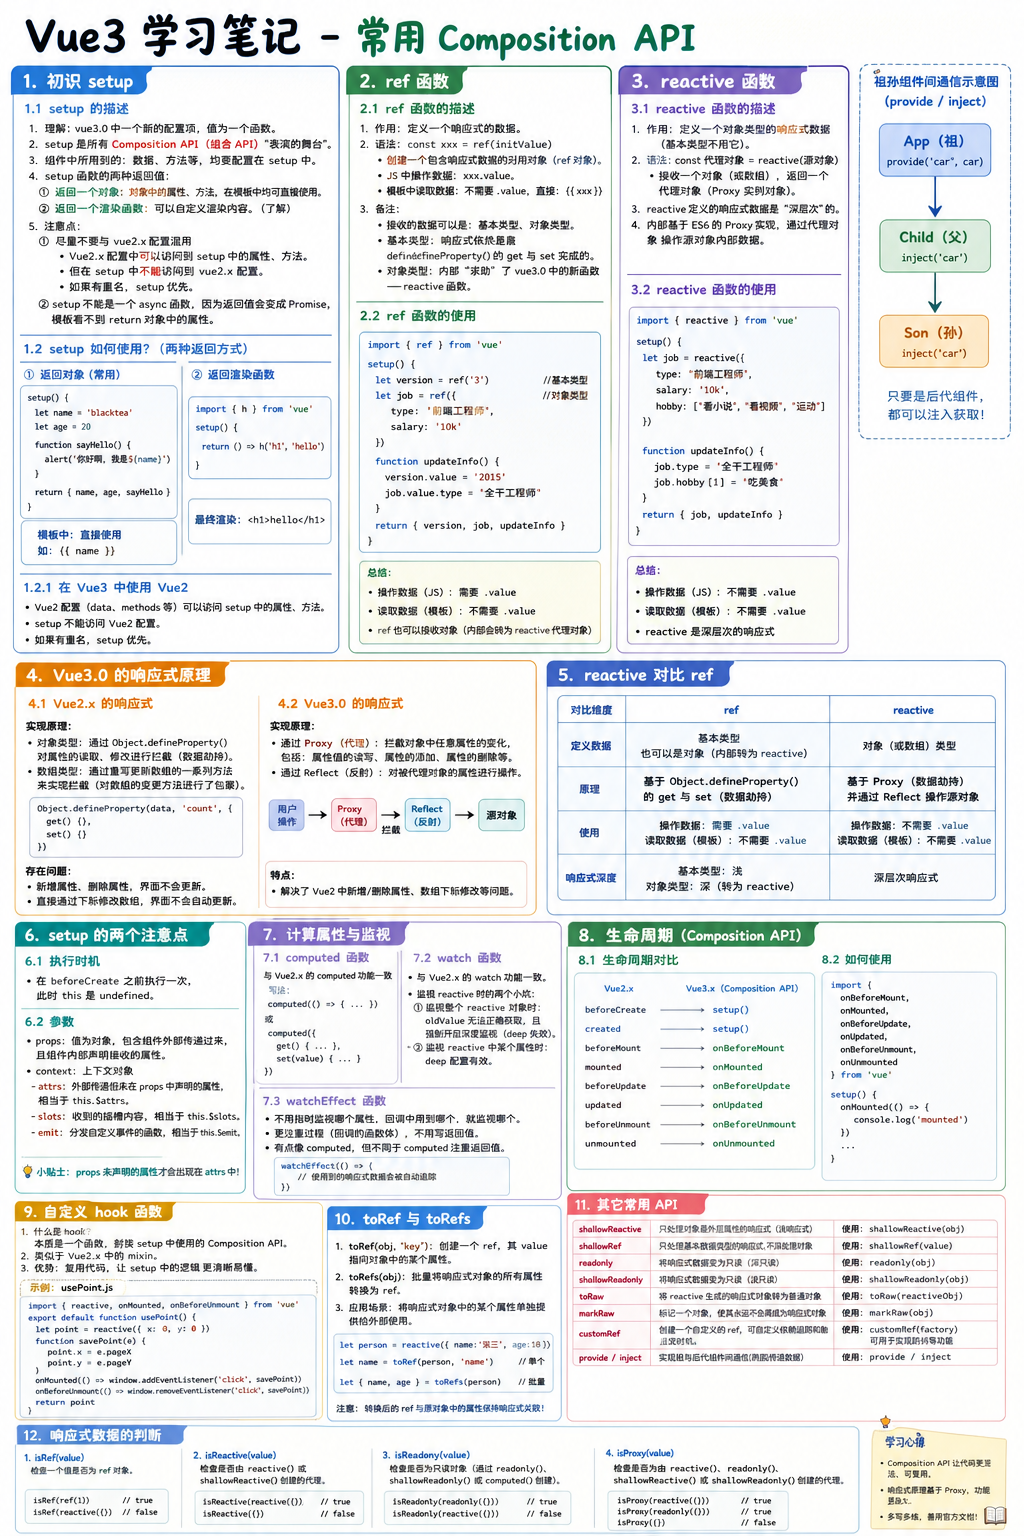
学习路线图
| 阶段 | 重点 | 说明 |
|---|---|---|
| 入门 | setup | 先知道 Vue3 代码主要写在哪里 |
| 核心 | ref、reactive | 掌握响应式数据的基本使用 |
| 理解 | 响应式原理 | 知道 Vue2 和 Vue3 的差别 |
| 常用 | computed、watch、watchEffect | 处理派生数据和监听变化 |
| 生命周期 | onMounted 等 | 处理组件创建、更新、卸载 |
| 解构 | toRef、toRefs | 避免解构后丢失响应式 |
| 进阶 | provide/inject、customRef 等 | 按需补充 |
一、Composition API 入门
1. setup
1.1 setup 是什么
setup 是 Vue3 Composition API 的入口。
你可以先把它理解成:
- Vue3 里写状态、方法、侦听、计算属性的主要位置。
- 模板中能直接使用的内容,需要从
setup中return出去。 setup也可以返回渲染函数,但平时更常见的是返回对象。
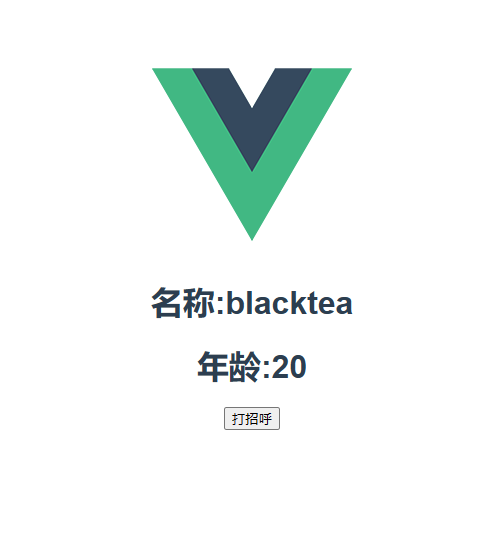
1.2 setup 的基本写法
<template>
  <h1>名称:{{ name }}</h1>
  <h1>年龄:{{ age }}</h1>
  <button @click="sayHello">打招呼</button>
</template>

<script>
export default {
  name: 'App',
  setup() {
    const name = 'blacktea'
    const age = 20

    function sayHello() {
      alert(`你好啊,我是${name}`)
    }

    return {
      name,
      age,
      sayHello
    }
  }
}
</script>
效果图:
1.3 setup 返回渲染函数
了解即可,入门阶段知道有这回事就够了。
<script>
import { h } from 'vue'

export default {
  name: 'App',
  setup() {
    return () => h('h1', 'hello')
  }
}
</script>
效果图:

1.4 setup 的注意点
先记结论
setup会在beforeCreate之前执行。setup中的this是undefined。- 不建议和 Vue2 的 Options API 大量混写。
- 如果同名,
setup返回的内容优先。 - 不建议把
setup直接写成async。
为什么不建议直接写成 async
因为 async setup() 返回的是 Promise,模板不能像普通对象那样直接拿到你返回的数据。
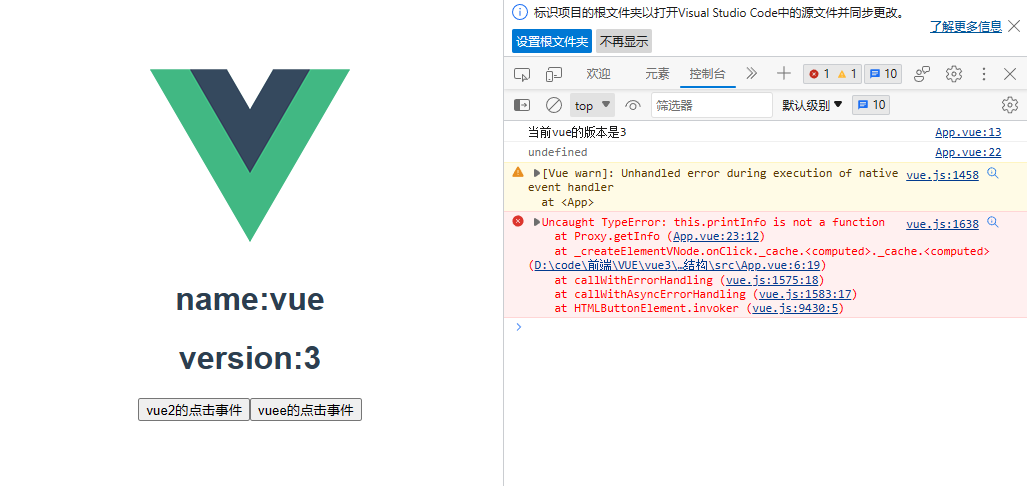
1.5 理解“不要依赖 setup 里的 this”
下面这个例子更适合拿来说明“访问边界”,而不是作为推荐写法:
<template>
  <h1>name: {{ name }}</h1>
  <h1>version: {{ version }}</h1>
  <button @click="printInfo">vue2 的点击事件</button>
  <button @click="getInfo">vue3 的点击事件</button>
</template>

<script>
export default {
  name: 'App',
  data() {
    return {
      name: 'vue',
      version: '2'
    }
  },
  methods: {
    printInfo() {
      console.log(`当前 ${this.name} 的版本是 ${this.version}`)
    }
  },
  setup() {
    const version = '3'

    function getInfo() {
      console.log('setup 中 this 为 undefined')
    }

    return {
      version,
      getInfo
    }
  }
}
</script>
效果图:
这一节的小结
setup是 Vue3 的主要入口return什么,模板就能用什么setup里不要写this.xxx
2. ref
2.1 ref 是什么
ref 用来定义响应式数据,最常用于基本类型。
const value = ref(初始值)2.2 你要记住的三件事
ref会返回一个ref对象。- 在 JS 中读写值时,要写
.value。 - 在模板中使用时,不需要写
.value。
2.3 ref 可以接收什么
- 基本类型:如字符串、数字、布尔值
- 对象类型:如对象、数组
当传入对象时,内部仍然会处理成响应式数据。
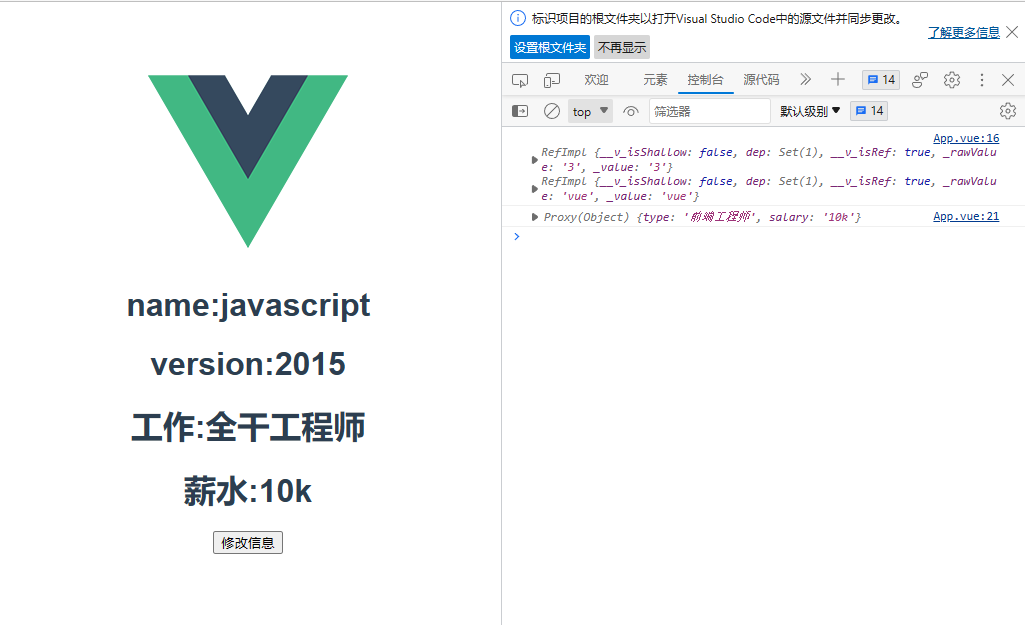
2.4 ref 示例
<template>
  <h1>name: {{ name }}</h1>
  <h1>version: {{ version }}</h1>
  <h1>工作:{{ job.type }}</h1>
  <h1>薪水:{{ job.salary }}</h1>
  <button @click="updateInfo">修改信息</button>
</template>

<script>
import { ref } from 'vue'

export default {
  name: 'App',
  setup() {
    const version = ref('3')
    const name = ref('vue')
    const job = ref({
      type: '前端工程师',
      salary: '10k'
    })

    function updateInfo() {
      version.value = '2015'
      name.value = 'javascript'
      job.value.type = '全干工程师'
    }

    return {
      name,
      version,
      job,
      updateInfo
    }
  }
}
</script>
效果图:
2.5 ref 的使用口诀
JS 里
.value,模板里直接用。
3. reactive
3.1 reactive 是什么
reactive 用来定义对象类型的响应式数据。
const proxyObj = reactive(源对象)3.2 reactive 的特点
- 更适合对象、数组这类结构化数据
- 返回的是
Proxy代理对象 - 默认是深层响应式
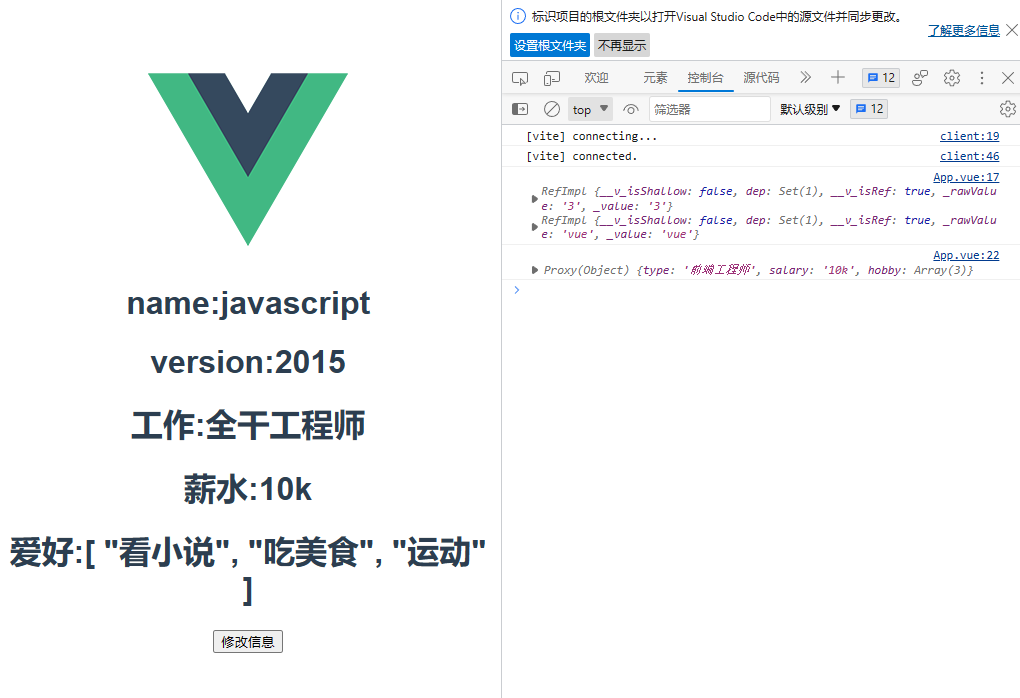
3.3 reactive 示例
<template>
  <h1>name: {{ name }}</h1>
  <h1>version: {{ version }}</h1>
  <h1>工作:{{ job.type }}</h1>
  <h1>薪水:{{ job.salary }}</h1>
  <h1>爱好:{{ job.hobby }}</h1>
  <button @click="updateInfo">修改信息</button>
</template>

<script>
import { ref, reactive } from 'vue'

export default {
  name: 'App',
  setup() {
    const version = ref('3')
    const name = ref('vue')
    const job = reactive({
      type: '前端工程师',
      salary: '10k',
      hobby: ['看小说', '看视频', '运动']
    })

    function updateInfo() {
      version.value = '2015'
      name.value = 'javascript'
      job.type = '全干工程师'
      job.hobby[1] = '吃美食'
    }

    return {
      name,
      version,
      job,
      updateInfo
    }
  }
}
</script>
效果图:
3.4 ref 和 reactive 怎么选
| 场景 | 推荐 |
|---|---|
| 基本类型 | ref |
| 对象、数组 | reactive |
| 希望统一用一种方式管理 | 也可以都用 ref,但对象操作要写 .value |
二、Vue3 响应式的理解
1. Vue2 和 Vue3 的区别
Vue2
Vue2 主要通过:
Object.defineProperty()- 对数组方法进行重写
来完成响应式处理。
它的典型问题是:
- 新增属性、删除属性处理不够自然
- 数组某些修改方式不够直接
Vue3
Vue3 主要通过:
Proxy代理对象Reflect执行对象操作
来完成响应式处理。
这样做的好处是:可以更自然地拦截对象属性的读取、修改、添加和删除。
2. 一个简化版示例
<!DOCTYPE html>
<html lang="en">
<head>
  <meta charset="UTF-8">
  <meta name="viewport" content="width=device-width, initial-scale=1.0">
  <title>Document</title>
</head>
<body>
  <script>
    const person = {
      name: 'blacktea',
      age: 20
    }

    const p = new Proxy(person, {
      get(target, propName) {
        console.log(`有人读取属性:${propName}`)
        return Reflect.get(target, propName)
      },
      set(target, propName, value) {
        console.log(`有人修改属性:${propName},传入的值是:${value}`)
        return Reflect.set(target, propName, value)
      },
      deleteProperty(target, propName) {
        console.log(`有人删除属性:${propName}`)
        return Reflect.deleteProperty(target, propName)
      }
    })
  </script>
</body>
</html>
3. ref 和 reactive 对比
| 对比维度 | ref | reactive |
|---|---|---|
| 适用数据 | 基本类型,也可包对象 | 对象、数组 |
| JS 中访问 | .value | 直接访问属性 |
| 模板中访问 | 直接使用 | 直接使用 |
| 底层表现 | 包装值 | Proxy 代理对象 |
小结
- 不要纠结“哪个更高级”
- 先按数据类型选,最省心
三、setup 的补充知识
1. setup 的执行时机
setup 会在 beforeCreate 之前执行,并且只执行一次。
同时要记住:
this === undefined2. setup 的参数
setup(props, context) 中常见的内容如下:
| 参数 | 说明 |
|---|---|
props | 组件接收到并声明过的属性 |
context.attrs | 没有在 props 中声明的属性 |
context.slots | 插槽内容 |
context.emit | 触发自定义事件的方法 |
3. 使用示例
App.vue
<template>
  <Hello name="blacktea" age="20" @hello="sayHello">
    <template #abc>
      <h1>插槽1</h1>
    </template>
    <template #bcd>
      <h1>插槽2</h1>
    </template>
  </Hello>
</template>

<script>
import Hello from './components/Hello.vue'

export default {
  name: 'App',
  components: { Hello },
  setup() {
    function sayHello(name) {
      alert(`你好,我是${name}`)
    }

    return {
      sayHello
    }
  }
}
</script>
Hello.vue
<template>
  <div>
    <slot name="abc"></slot>
    <h1>学生信息</h1>
    <h2>姓名: {{ name }}</h2>
    <h2>年龄: {{ age }}</h2>
    <button @click="hello">打招呼</button>
    <slot name="bcd"></slot>
  </div>
</template>

<script>
export default {
  name: 'Hello',
  props: ['name', 'age'],
  emits: ['hello'],
  setup(props, context) {
    function hello() {
      context.emit('hello', props.name)
    }

    console.log(props)
    console.log(context.attrs)
    console.log(context.slots)
    console.log(context.emit)

    return {
      hello
    }
  }
}
</script>
四、计算属性与侦听
1. computed
1.1 什么时候用
当一个值要由其他值计算出来时,用 computed。
1.2 示例
<template>
  <div>
    姓:<input type="text" v-model="person.firstName">
    <br>
    名:<input type="text" v-model="person.lastName">
    <br>
    姓名:{{ person.fullName }}
    <br>
    修改姓名:<input type="text" v-model="person.fullName">
  </div>
</template>

<script>
import { reactive, computed } from 'vue'

export default {
  setup() {
    const person = reactive({
      firstName: '张',
      lastName: '三'
    })

    person.fullName = computed({
      get() {
        return person.firstName + '-' + person.lastName
      },
      set(value) {
        const nameArr = value.split('-')
        person.firstName = nameArr[0]
        person.lastName = nameArr[1]
      }
    })

    return {
      person
    }
  }
}
</script>
1.3 记忆点
- 只读计算属性:只写
get - 可读可改计算属性:写
get + set
2. watch
2.1 watch 的特点
watch 适合“明确知道要监听谁”的场景。
你可以把它理解成:
- 先指定监听源
- 再写变化之后的回调
2.2 常见写法
<script>
import { ref, reactive, watch } from 'vue'

export default {
  setup() {
    const sum = ref(0)
    const msg = ref('你好啊')
    const person = reactive({
      name: 'blacktea',
      age: 20,
      job: {
        info: {
          salary: 11
        }
      }
    })

    watch(sum, (newValue, oldValue) => {
      console.log('sum 变了', newValue, oldValue)
    })

    watch([sum, msg], (newValue, oldValue) => {
      console.log('sum 或 msg 变了', newValue, oldValue)
    })

    watch(() => person.age, (newValue, oldValue) => {
      console.log('age 变了', newValue, oldValue)
    })

    watch(
      () => person.job,
      (newValue, oldValue) => {
        console.log('job 变了', newValue, oldValue)
      },
      { deep: true }
    )

    return {
      sum,
      msg,
      person
    }
  }
}
</script>
2.3 watch 的易错点
- 监听
reactive某个属性时,要写成函数:() => person.age - 监听多个源时,用数组包起来
- 监听对象内部层级变化时,通常要考虑
deep: true
3. watchEffect
3.1 watchEffect 是什么
watchEffect 更像“自动收集依赖”。
它和 watch 的区别可以这样记:
| API | 你要做什么 |
|---|---|
watch | 明确指定监听源 |
watchEffect | 直接写逻辑,用到谁就跟踪谁 |
3.2 示例
<script>
import { ref, reactive, watchEffect } from 'vue'

export default {
  setup() {
    const sum = ref(0)
    const person = reactive({
      name: 'blacktea',
      age: 20,
      job: {
        info: {
          salary: 11
        }
      }
    })

    watchEffect(() => {
      const x1 = sum.value
      const x2 = person.job.info.salary
      console.log('watchEffect 执行了', x1, x2)
    })

    return {
      sum,
      person
    }
  }
}
</script>
3.3 记忆方式
computed更关注“结果”watchEffect更关注“过程”
五、生命周期
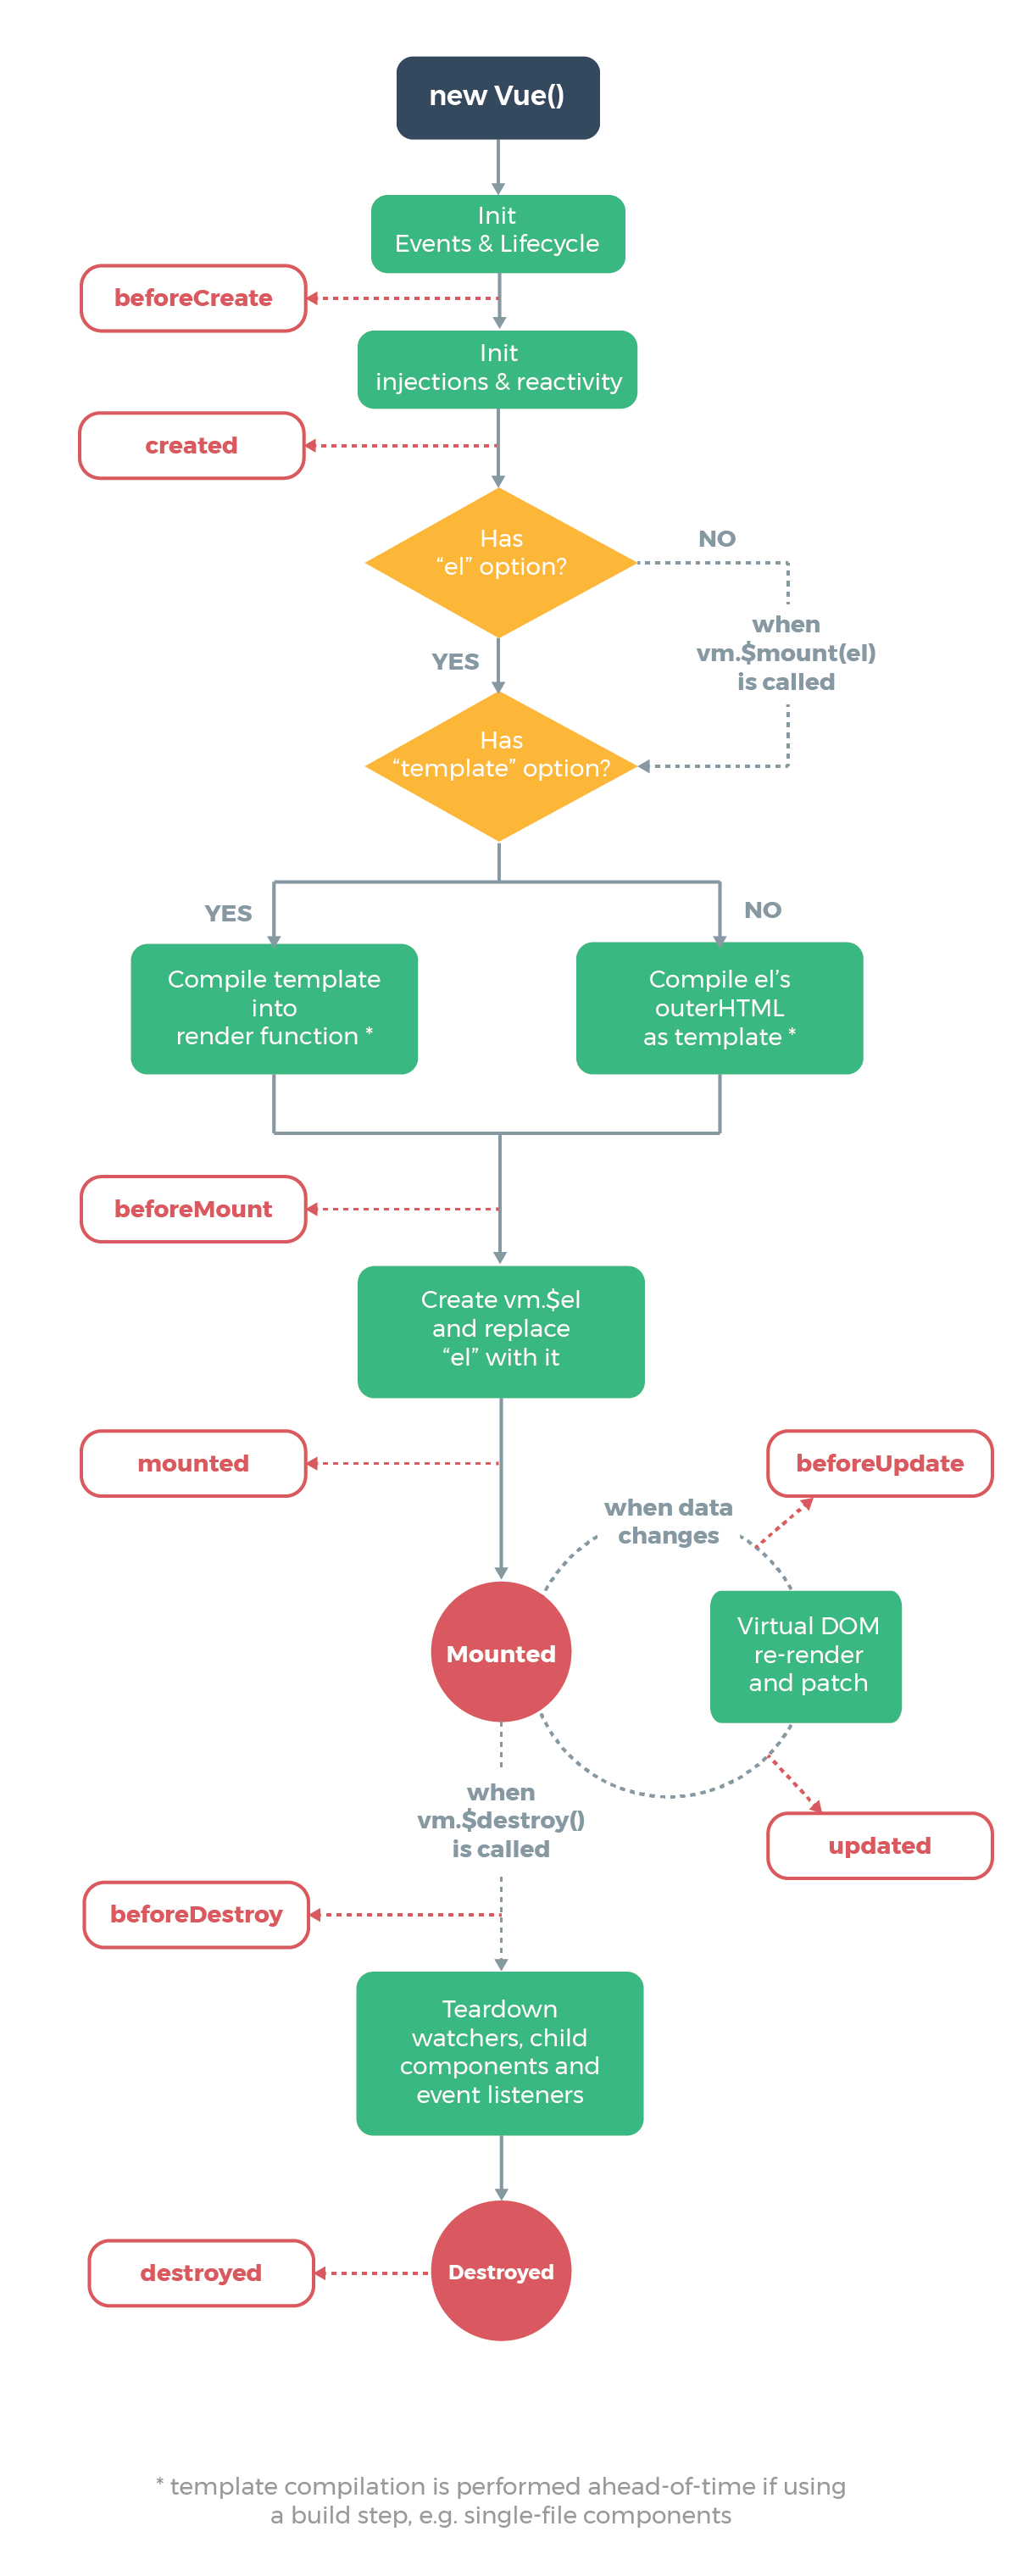
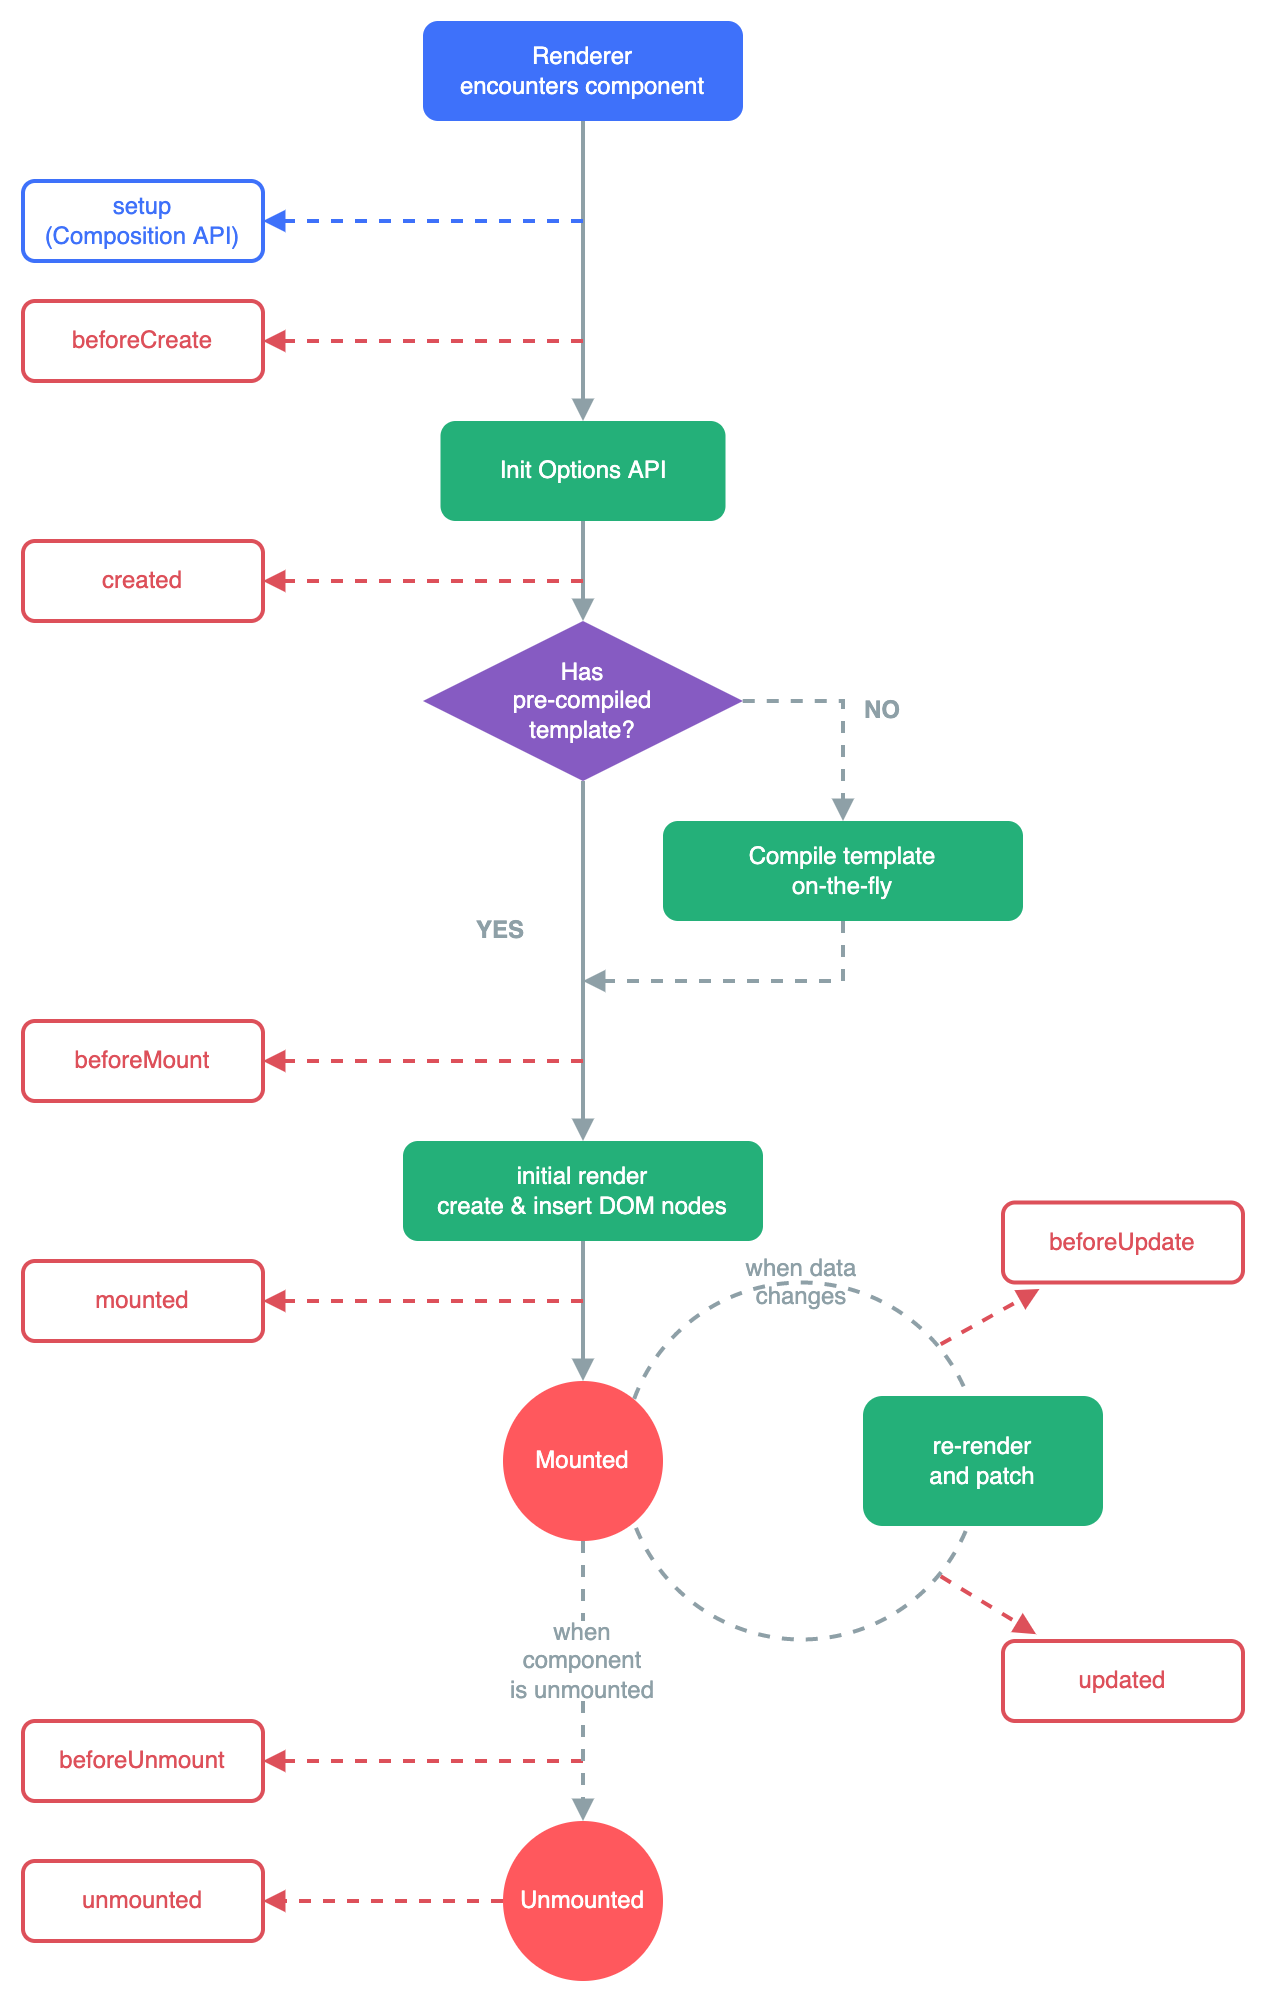
1. Vue2 和 Vue3 生命周期对照
| Vue2 | Vue3 Composition API |
|---|---|
beforeCreate | setup() |
created | setup() |
beforeMount | onBeforeMount |
mounted | onMounted |
beforeUpdate | onBeforeUpdate |
updated | onUpdated |
beforeUnmount | onBeforeUnmount |
unmounted | onUnmounted |
相关示意图:
2. 示例
<script>
import {
  ref,
  onBeforeMount,
  onMounted,
  onBeforeUpdate,
  onUpdated,
  onBeforeUnmount,
  onUnmounted
} from 'vue'

export default {
  name: 'Demo',
  setup() {
    const sum = ref(0)

    onBeforeMount(() => {
      console.log('---onBeforeMount---')
    })
    onMounted(() => {
      console.log('---onMounted---')
    })
    onBeforeUpdate(() => {
      console.log('---onBeforeUpdate---')
    })
    onUpdated(() => {
      console.log('---onUpdated---')
    })
    onBeforeUnmount(() => {
      console.log('---onBeforeUnmount---')
    })
    onUnmounted(() => {
      console.log('---onUnmounted---')
    })

    return { sum }
  }
}
</script>
六、自定义 hook
1. 什么是 hook
在 Vue3 里,hook 本质上就是一个可复用函数,用来封装 setup 中的逻辑。
常见价值:
- 抽离重复逻辑
- 提高复用性
- 让组件更干净
2. 示例:记录点击坐标
usePoint.js
import { reactive, onMounted, onBeforeUnmount } from 'vue'

export default function usePoint() {
  const point = reactive({
    x: 0,
    y: 0
  })

  function savePoint(event) {
    point.x = event.pageX
    point.y = event.pageY
  }

  onMounted(() => {
    window.addEventListener('click', savePoint)
  })

  onBeforeUnmount(() => {
    window.removeEventListener('click', savePoint)
  })

  return point
}
使用时的好处
多个组件可以直接复用这一套逻辑,而不需要每个组件都再写一遍事件监听和清理代码。
七、toRef 与 toRefs
1. 作用
它们主要用于把响应式对象中的属性转换成 ref,方便解构后继续保留响应式能力。
2. 区别
| API | 作用 |
|---|---|
toRef(obj, 'key') | 只把一个属性转成 ref |
toRefs(obj) | 把整个对象的每个属性都转成 ref |
3. 示例
<script>
import { reactive, toRef, toRefs } from 'vue'

export default {
  setup() {
    const person = reactive({
      name: 'blacktea',
      age: 20,
      job: {
        info: {
          salary: 11
        }
      }
    })

    const name = toRef(person, 'name')
    const obj = toRefs(person)

    console.log(name)
    console.log(obj)

    return {
      ...obj
    }
  }
}
</script>
4. 为什么它们重要
因为对 reactive 对象直接解构,往往会丢失响应式;toRef 和 toRefs 就是为了解决这个问题。
八、其它 Composition API
1. shallowReactive 与 shallowRef
核心概念
shallowReactive:只处理对象最外层属性的响应式shallowRef:只处理.value本身,不深度处理对象内部
什么时候用
- 对象层级深,但只关心第一层变化
- 更关心整体替换,而不是内部属性变化
2. readonly 与 shallowReadonly
核心概念
readonly:深只读shallowReadonly:浅只读
场景
当你希望某份响应式数据在当前作用域中只能读、不能改时使用。
3. toRaw 与 markRaw
toRaw
作用:把响应式代理对象还原成普通对象。
适用场景:只想读取或操作原始对象,不希望触发视图更新。
markRaw
作用:标记一个对象,使它永远不会变成响应式对象。
适用场景:
- 第三方类库实例
- 不需要响应式的大对象
- 只想原样挂载的数据
示例
<script>
import { ref, reactive, toRefs, toRaw, markRaw } from 'vue'

export default {
  setup() {
    const sum = ref(0)
    const person = reactive({
      name: 'blacktea',
      age: 20,
      job: {
        info: {
          salary: 11
        }
      }
    })

    function showRawPerson() {
      const p = toRaw(person)
      p.age++
      console.log(p)
    }

    function addCar() {
      const car = {
        name: '特斯拉',
        price: 30
      }
      person.car = markRaw(car)
    }

    return {
      person,
      ...toRefs(person),
      sum,
      showRawPerson,
      addCar
    }
  }
}
</script>
4. customRef
作用
customRef 允许你自己控制依赖收集和触发更新的时机。
最典型的场景就是:防抖输入。
防抖示例
import { customRef } from 'vue'

export function useDebouncedRef(value, delay = 200) {
  let timeout

  return customRef((track, trigger) => {
    return {
      get() {
        track()
        return value
      },
      set(newValue) {
        clearTimeout(timeout)
        timeout = setTimeout(() => {
          value = newValue
          trigger()
        }, delay)
      }
    }
  })
}
组件中使用:
<script setup>
import { useDebouncedRef } from './debouncedRef'

const text = useDebouncedRef('hello')
</script>

<template>
  <input v-model="text" />
</template>
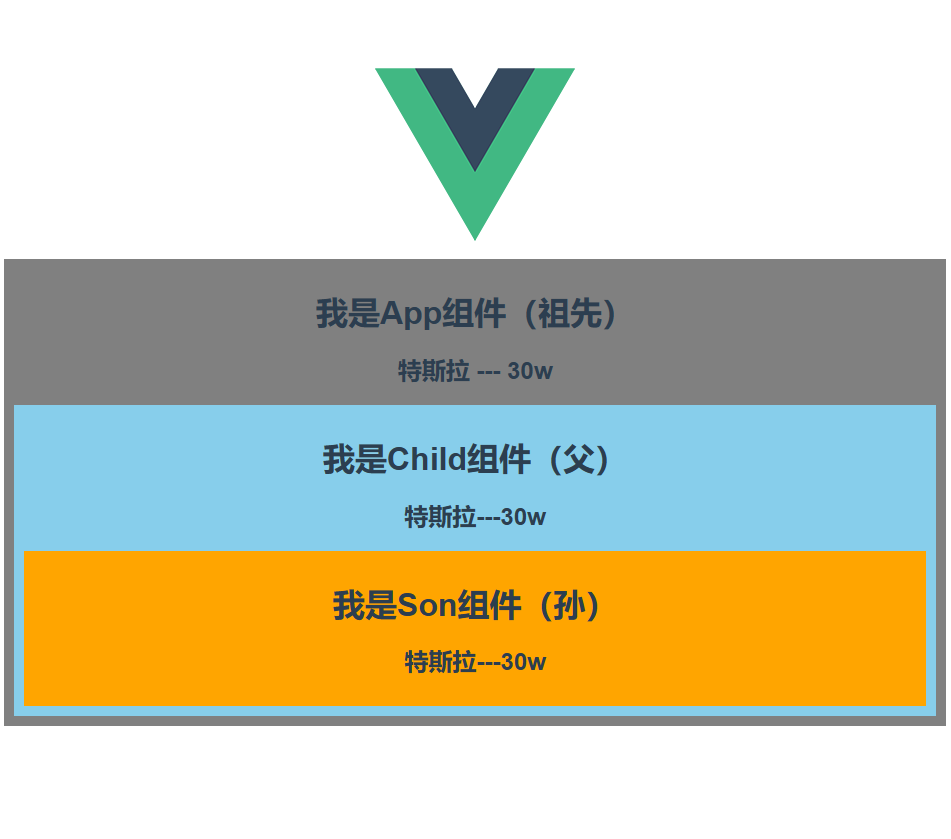
5. provide 与 inject
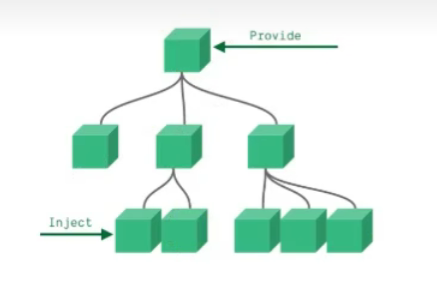
作用
用于祖先组件向后代组件传值,适合跨层级通信。
基本写法
祖先组件中:
setup() {
  const car = reactive({
    name: '特斯拉',
    price: '30w'
  })

  provide('car', car)
}
后代组件中:
setup() {
  const car = inject('car')
  return { car }
}
效果图:
6. 响应式数据的判断
常用方法
| API | 作用 |
|---|---|
isRef | 判断是不是 ref |
isReactive | 判断是不是响应式代理 |
isReadonly | 判断是不是只读代理 |
isProxy | 判断是不是代理对象 |
记忆方式
ref看isRef- 响应式对象看
isReactive - 只读对象看
isReadonly - 代理对象统一可看
isProxy
九、最后怎么复习
如果你想先掌握 Vue3 的日常开发主线,建议优先吃透这几个点:
setupref和reactivecomputedwatch和watchEffect- 生命周期钩子
toRef和toRefs
十、一页总结
核心认知
setup是入口ref适合基本类型reactive适合对象和数组computed处理派生值watch/watchEffect处理变化监听toRefs解决解构丢响应式问题
学完这篇后你应该能回答
- 为什么
setup里不能直接用this ref和reactive什么时候各自适合watch和watchEffect的区别是什么- 为什么
reactive解构后可能丢失响应式 provide/inject适合解决什么问题
下一步建议
继续学习时,可以顺着这条路线往下:
script setup- 组合式组件拆分方式
- Pinia 状态管理
- Vue Router
- Vue3 + TypeScript